06-实现向前跳跃
1. 刚体
你好,我是悦创。
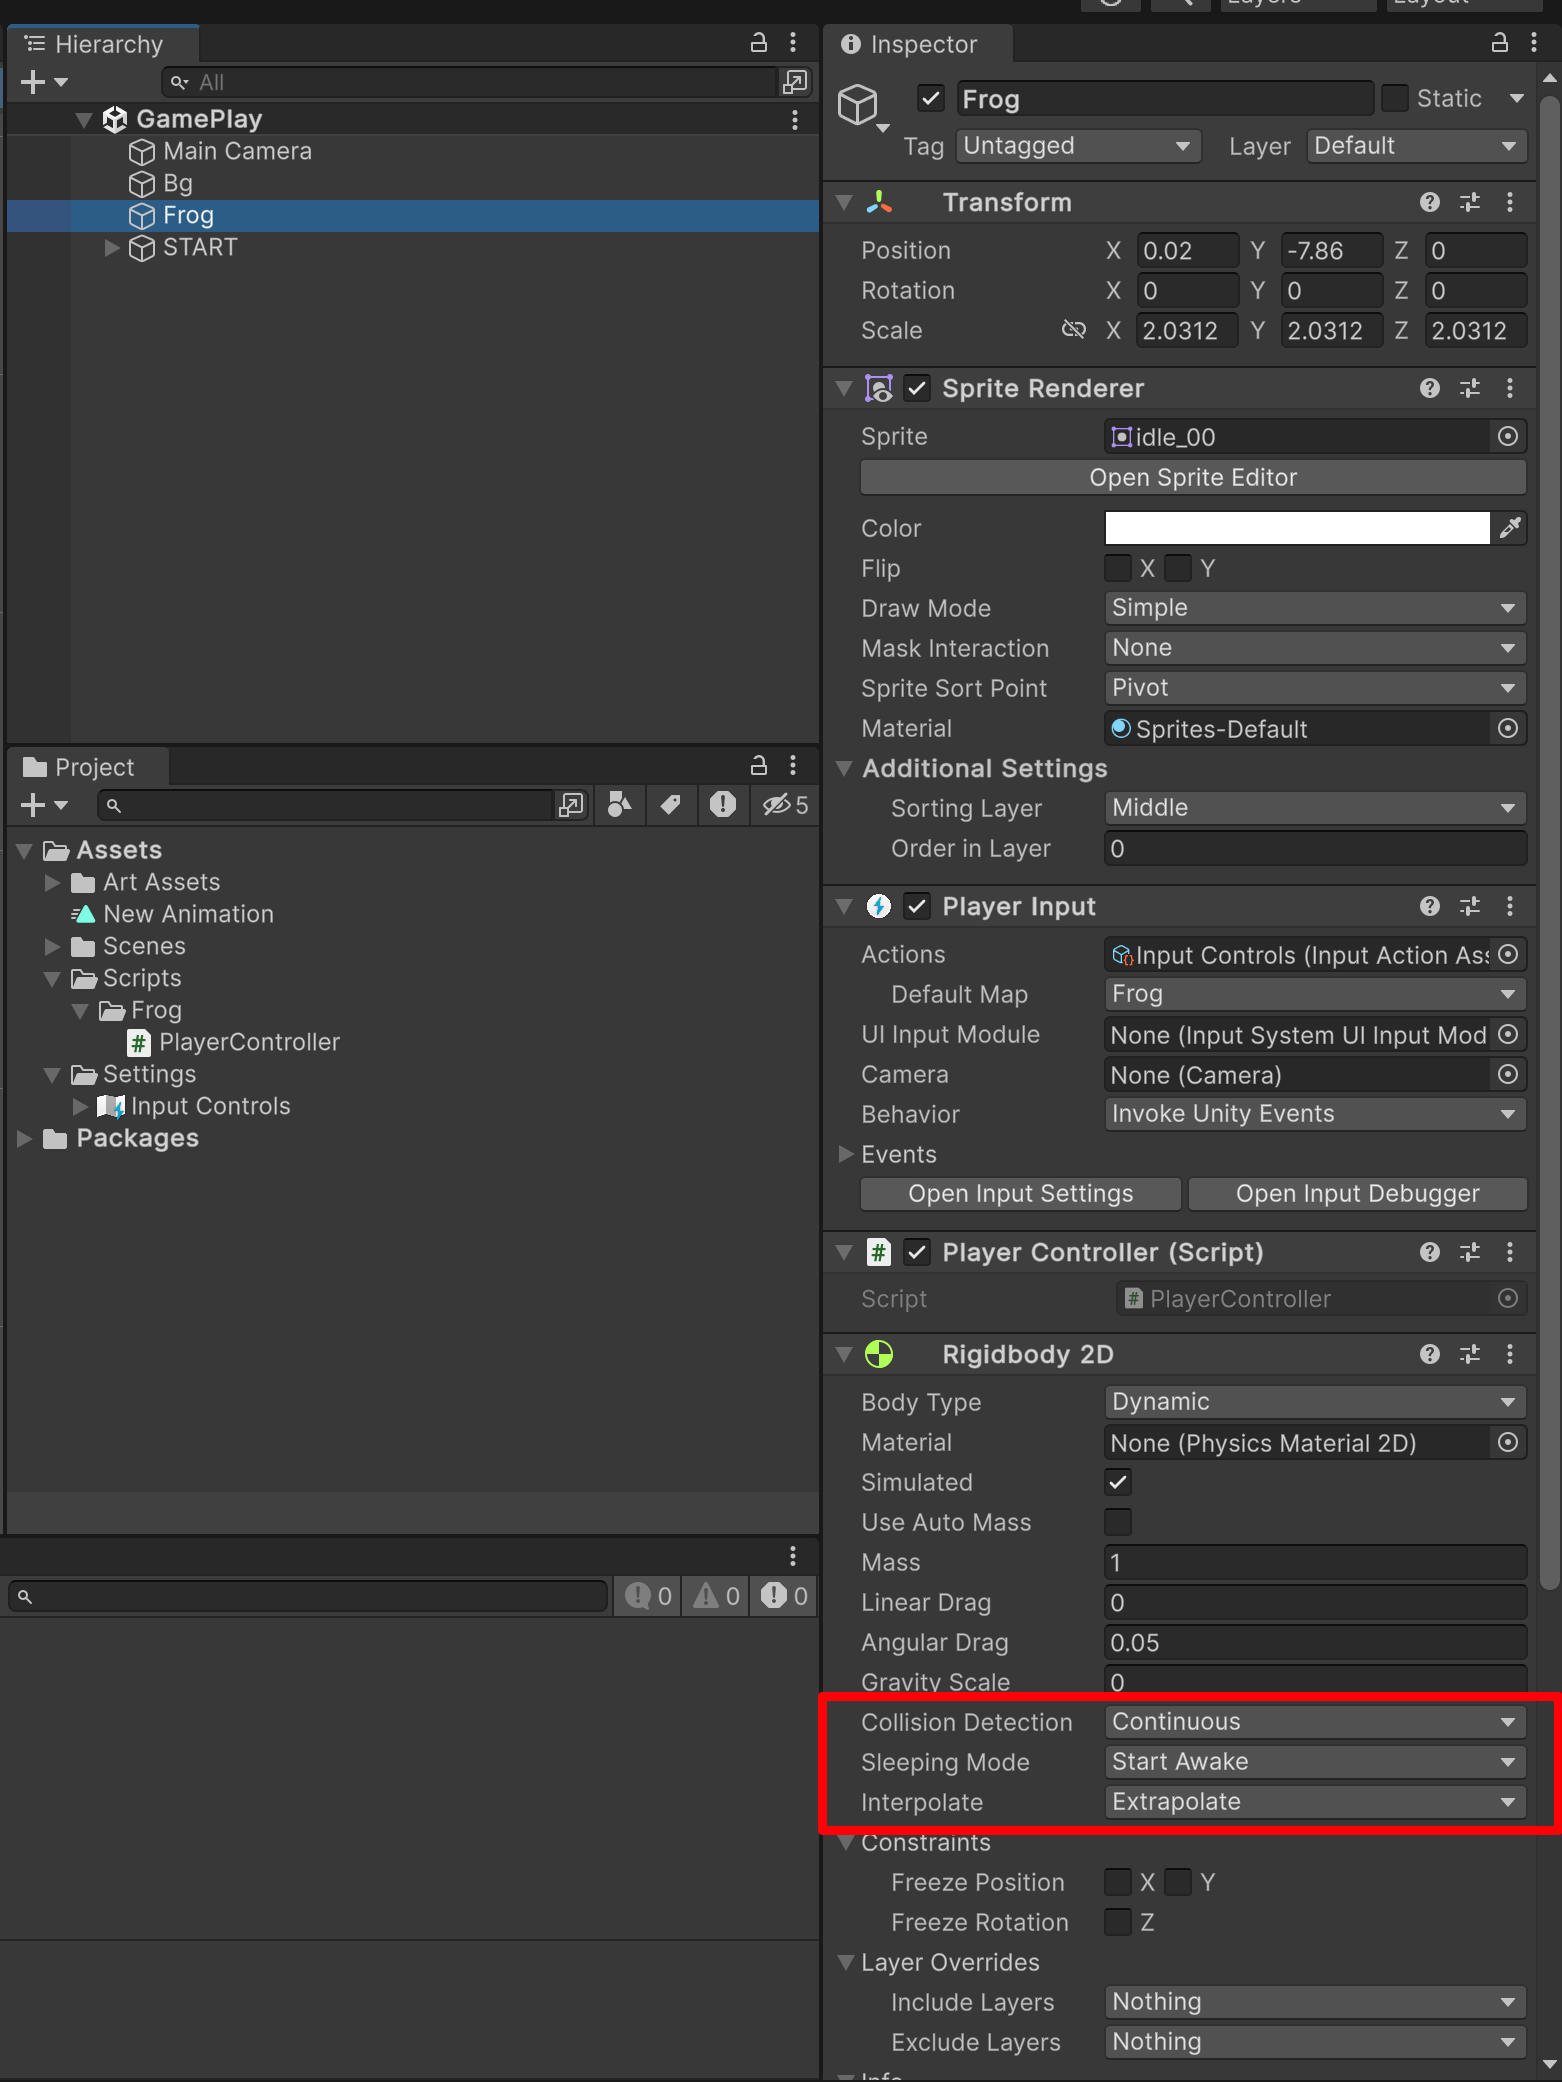
我现在要让小青蛙移动起来,而我们现在的小青蛙只是一张图片。我们需要把小青蛙变成真实的物体。
如何变成真实的物体呢?——就是为他添加一个钢体的组件。
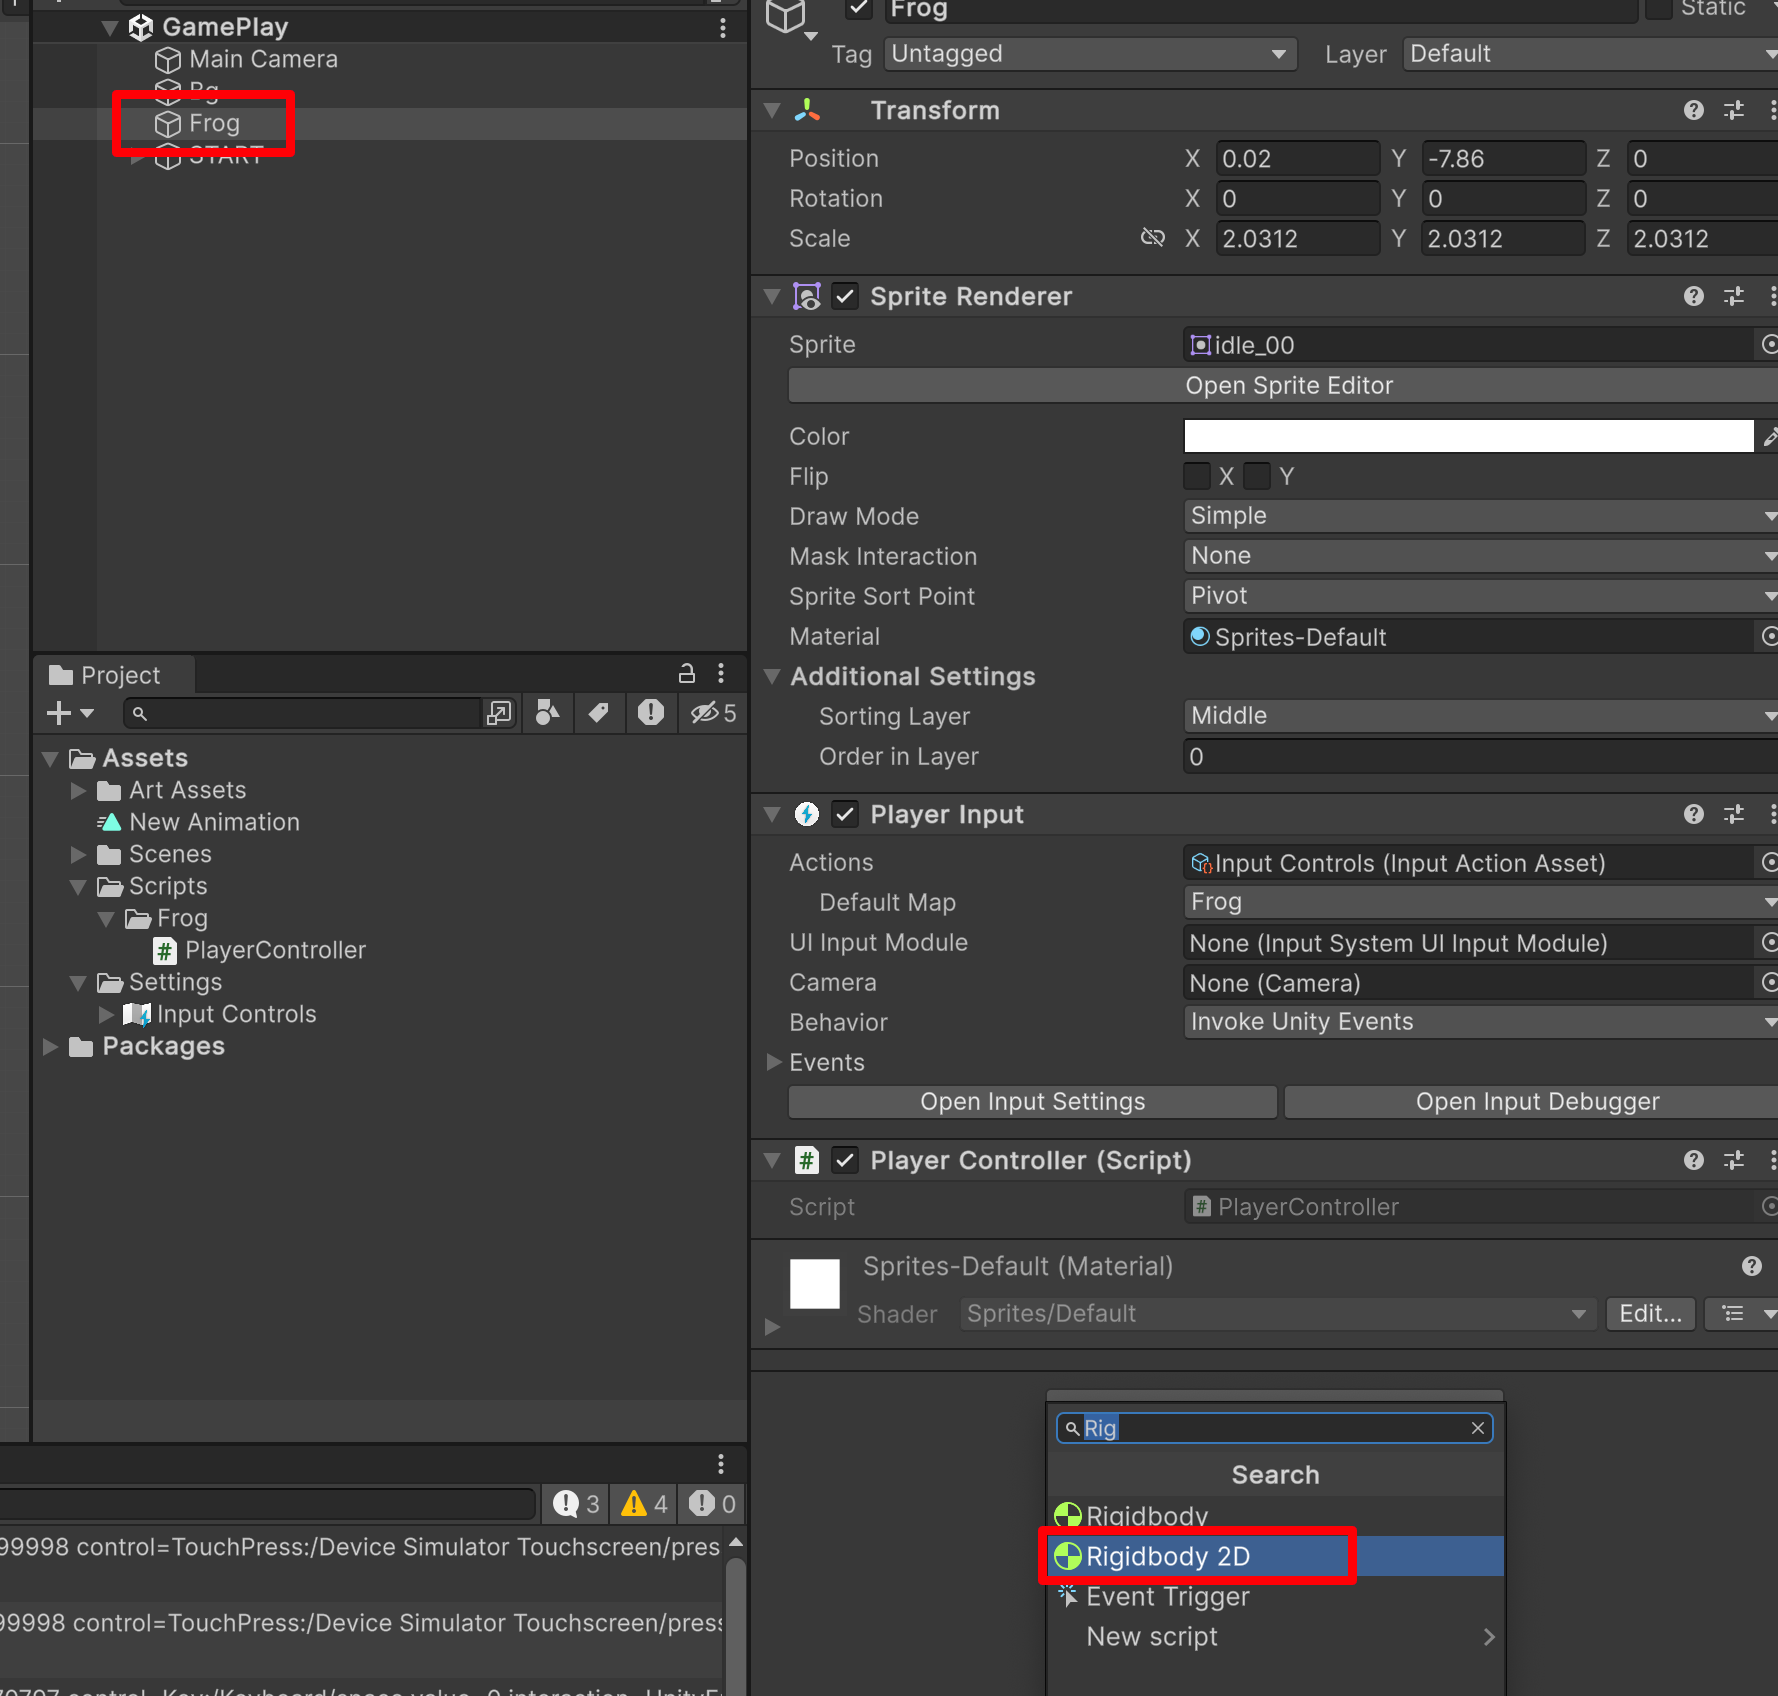
2D 的钢体可以模拟物理的效果。——一旦一个物体有了钢体,就模拟真实世界中的一个真实的物体。
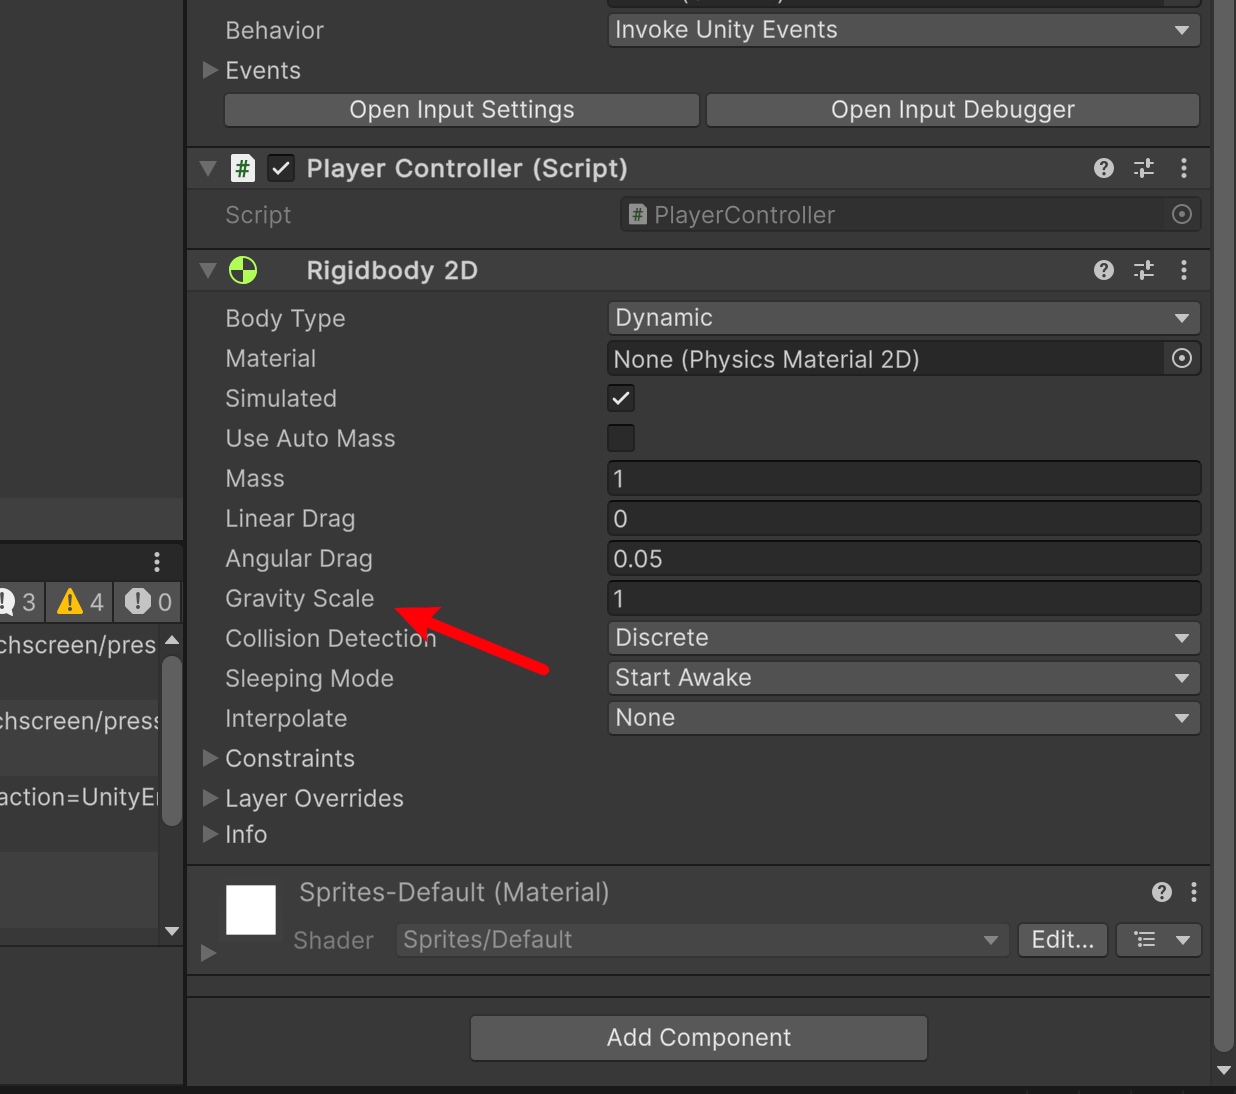
也就是,角色有了重力。
此时,我们运行游戏,你会发现小青蛙会自己向下滑走。
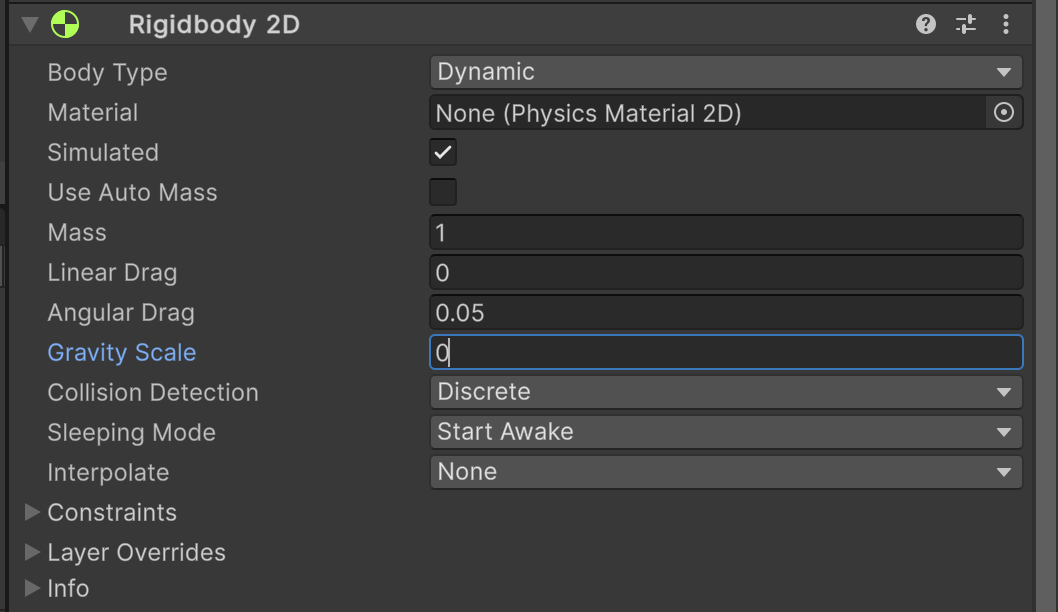
我们如果不希望它掉落,我们可以将他改成 0。这样就不会自己往下滑走了。
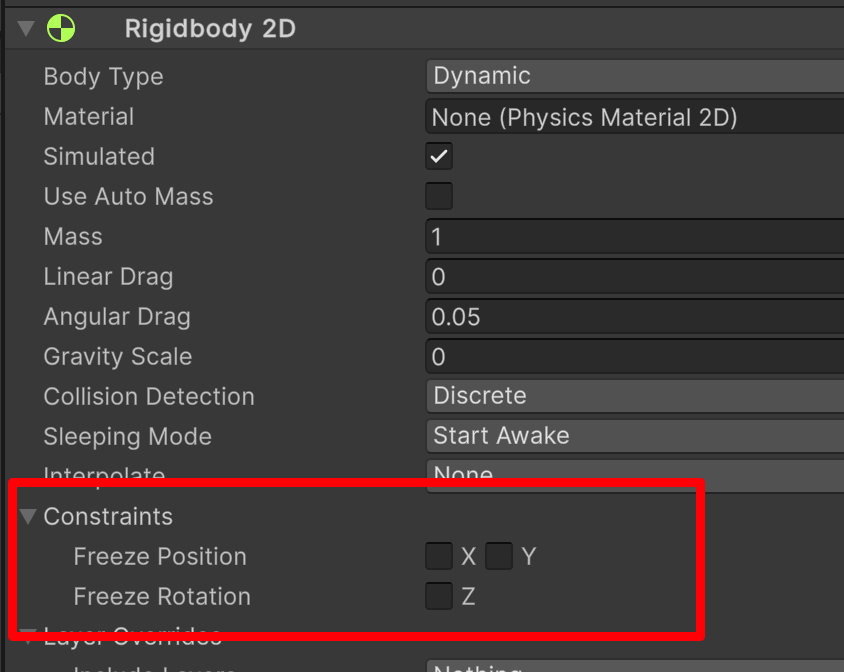
上面这个就是锁定坐标,锁定 X 轴就不能左右移动,锁定 Y 就不能上下移动,锁定 Z 那就不能旋转「也就是不会因为,我们碰撞了什么而导致旋转」。
那不能旋转,是我们需要的。我们勾选 Z。

如果你选择 static ,那就变成静态物体了。也就没有模拟物理效果了。「点击问号查询文档」
Body Type 有三个选项;每个选项定义一种常见和固定的行为。附加到 2D 刚体的 2D 碰撞体将继承 2D 刚体的 Body Type。这三个选项是:
- Dynamic
- Kinematic
- Static
所选的选项将定义:
- 移动(位置和旋转)行为
- 碰撞体相互作用
请注意,尽管经常将 2D 刚体表述为相互碰撞,但实际上发生碰撞的是每个刚体所连接的 2D 碰撞体。如果没有碰撞体,2D 刚体不能相互碰撞。
改变 2D 刚体的 Body Type 可能是一个复杂的过程。Body Type 发生变化时,各种与质量相关的内部属性都将立即重新计算,并且在游戏对象的下一个 FixedUpdate 期间需要重新估算连接到 2D 刚体的 2D 碰撞体的所有现有触点。根据触点数量以及连接到刚体的 2D 碰撞体数量,更改 Body Type 可能会导致性能变化。「FixedUpdate() 类似,代码中的 Update,具体要看你电脑情况,没每台电脑帧数是不一样的。」有的电脑只能执行30次,有的电脑只能执行40次。如果,我把同样的 update 放在设置里面的话,很有可能在不同的设备上,得到不同的结果。
- 所以,通常输入的计算、布尔值的计算我们会放在 update 中;
- 使用刚体去模拟物理的判断,我们放在 FixedUpdate 当中。
那么 Update 一般会判断什么呢?——一些值的判断。「例如:布尔值、键盘输入的判断,反正电脑配置不一样,我们需要通过当前电脑输入的去判断。
使用刚体,模拟物理的判断,我们放在 FixedUpdate 当中。
| 属性: | 功能: | |
|---|---|---|
| Body Type | 设置 2D 刚体的组件设置,从而可操纵移动(位置和旋转)行为和 2D 碰撞体交互。 选项为:Dynamic**、**Kinematic、Static | |
| Material | 使用此属性可为连接到特定父 2D 刚体的所有 2D 碰撞体指定公共材质。 **注意:**2D 碰撞体使用自己的 Material 属性(如果已设置)。如果此处或在 2D 碰撞体中未指定材质,则默认选项为 None (Physics Material 2D)。这种情况下使用可在 Physics 2D 窗口中设置的默认材质。 2D 碰撞体使用以下优先级顺序来确定要使用的 Material 设置: 1. 在 2D 碰撞体上指定的 2D 物理材质。 2.在附加的 2D 刚体上指定的 2D 物理材质。 在 Physics 2D 窗口中指定的 2D 物理材质默认材质。 **提示:**使用此设置确保附加到同一 Static Body Type 2D 刚体的所有 2D 碰撞体都可使用同一材质。 | |
| Simulated | 如果希望 2D 刚体以及所有附加的 2D 碰撞体和 2D 关节在运行时与物理模拟系统交互,请启用 Simulated__(选中复选框)。如果禁用此功能(取消选中复选框),这些组件不会与模拟系统进行交互。请参阅下面的 2D 刚体属性:Simulated 以了解更多详细信息。默认情况下会选中此框。 | | Use Auto Mass__ | 如果希望 2D 刚体从其 2D 碰撞体中自动检测游戏对象的质量,请选中此框。 |
| Mass | 定义 2D 刚体的质量。如果已选中 Use Auto Mass,此属性将显示灰色。 | |
| Linear Drag | 一种会影响位置移动的阻力系数。 | |
| Angular Drag | 一种会影响旋转移动的阻力系数。 | |
| Gravity Scale | 定义游戏对象受重力影响的程度。 | |
| Collision Detection | 定义如何检测 2D 碰撞体之间的碰撞。 | |
| Discrete | 将 Collision Detection 设置为 Discrete 时,具有 2D 刚体和 2D 碰撞体的游戏对象在物理更新期间可以重叠或穿过彼此(如果移动得足够快/会出现穿模的情况)。仅会在新位置生成碰撞触点。 | |
| Continuous | Collision Detection 设置为 Continuous 时,具有 2D 刚体和 2D 碰撞体的游戏对象在更新期间不会穿过彼此。相反,Unity 会计算 2D 碰撞体的第一个影响点,并将游戏对象移动到该点。请注意,此设置比 Discrete 耗费更多 CPU 时间。 | |
| Sleeping Mode | 定义游戏对象如何在处于静止状态时“睡眠”以节省处理器时间。「总不能一直后台运行耗费资源吧」 | |
| Never Sleep | 禁用睡眠(应尽可能避免此设置,否则会影响系统资源)。 | |
| Start Awake | 游戏对象最初处于唤醒状态。 | |
| Start Asleep | 游戏对象最初处于睡眠状态,但可以被碰撞唤醒。 | |
| Interpolate | 定义如何在物理更新间隔之间插入游戏对象的移动(运动趋于颠簸状态时很有用)。 | |
| None | 不应用移动平滑。 | |
| Interpolate | 根据游戏对象在先前帧中的位置来平滑移动。 | |
| Extrapolate | 根据游戏对象在下一帧中的估计位置来平滑移动。 | |
| Constraints | 定义对 2D 刚体运动的任何限制。 | |
| Freeze Position | 选择性停止 2D 刚体沿世界 X 和 Y 轴的移动。 | |
| Freeze Rotation | 选择性停止 2D 刚体围绕 Z 轴的旋转。 |
请勿使用变换「Transform」组件来设置 Dynamic 类型的 2D 刚体的位置或旋转。模拟系统会根据 Dynamic 2D 刚体的速度对该刚体重新定位;可以通过脚本施加于刚体的力来直接更改此值,也可以通过碰撞和重力来间接更改此值。

按上面的讲解,我们来设置对应的功能。
2. 设置碰撞💥体
- Frog
- Physics 2D
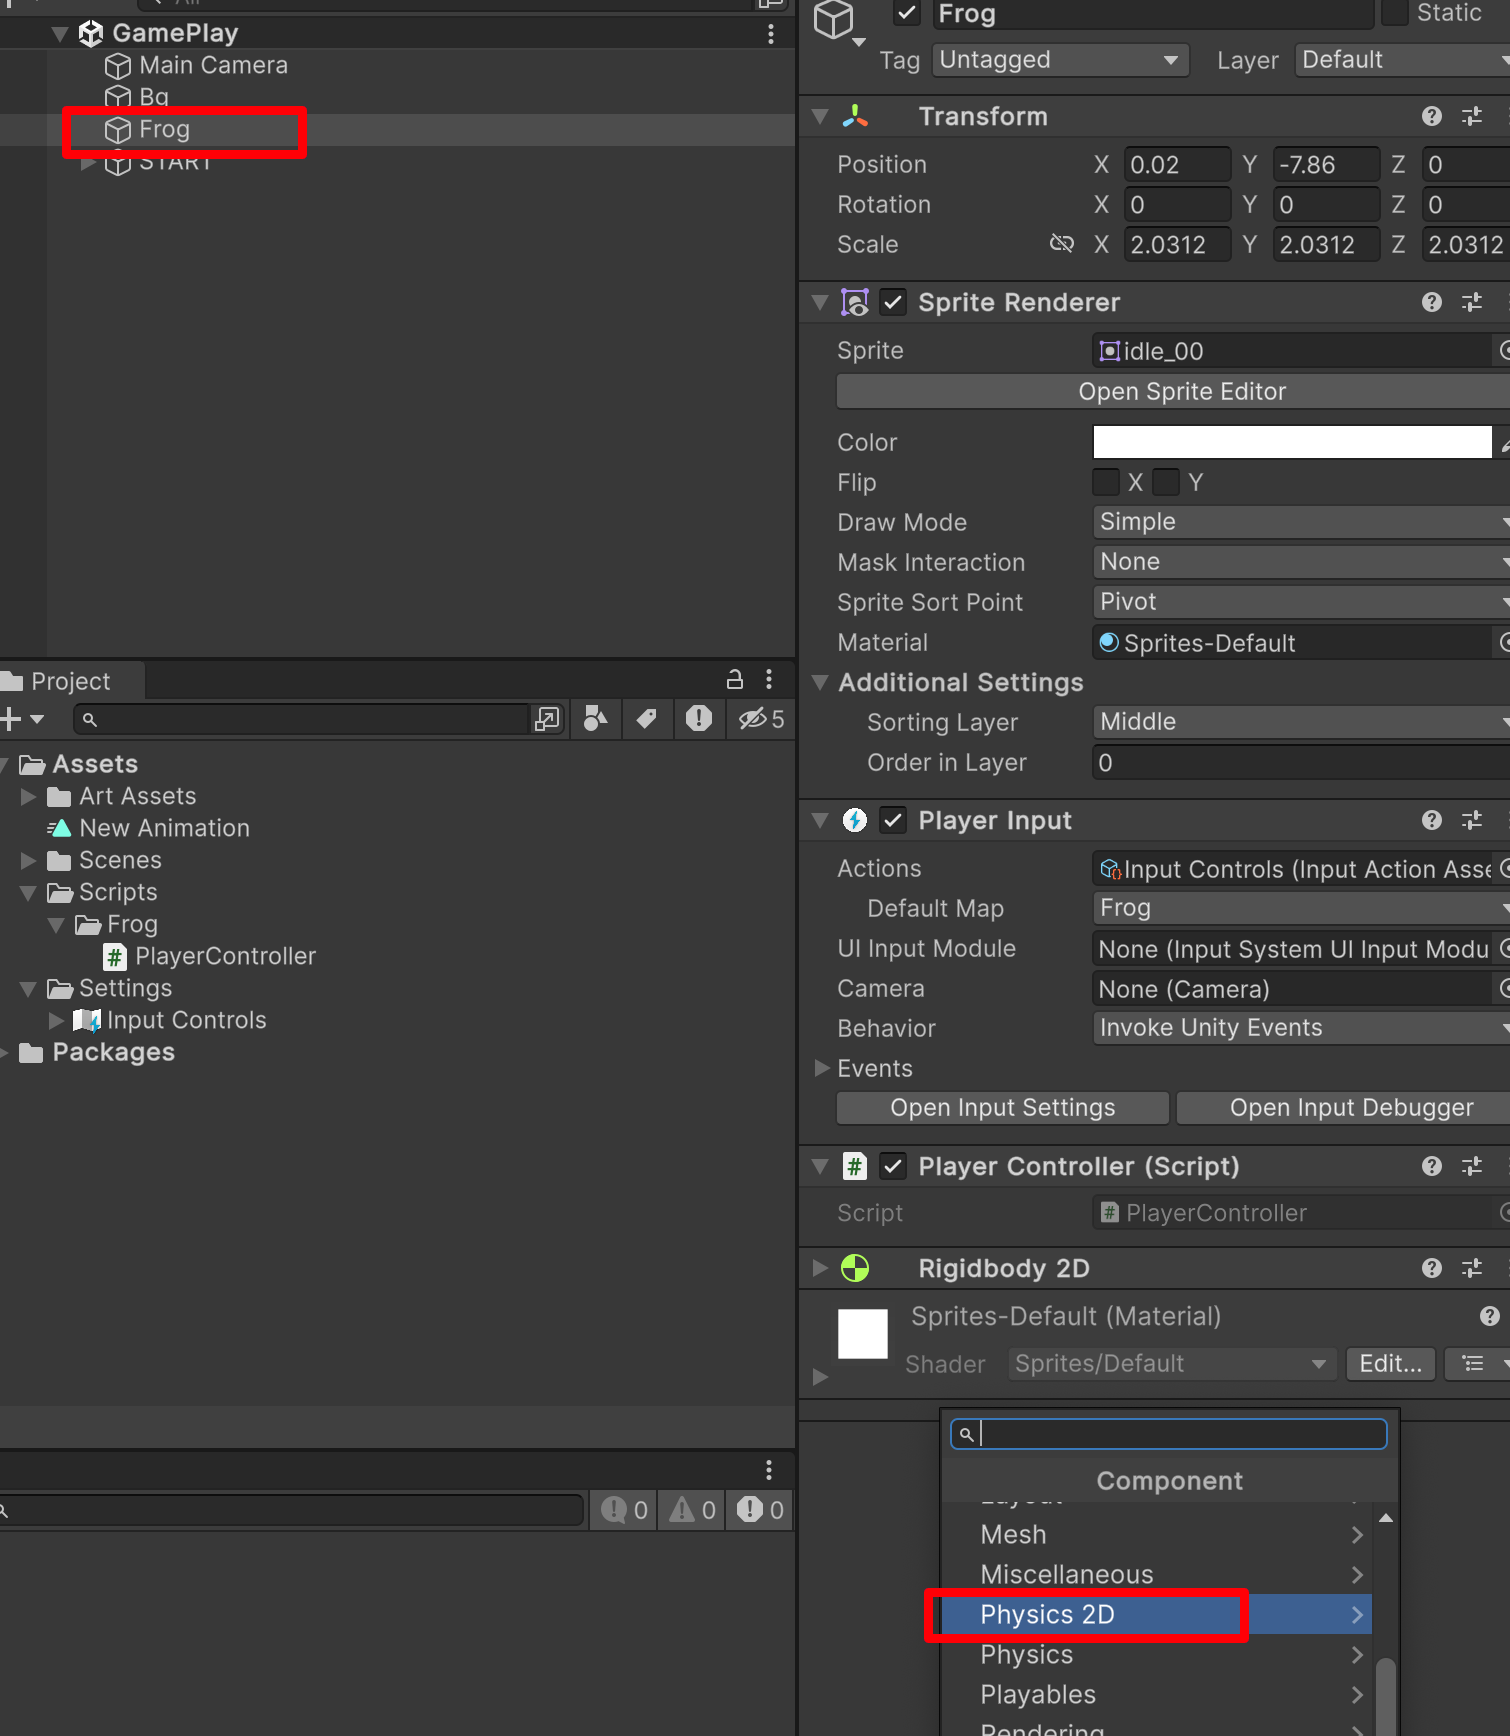
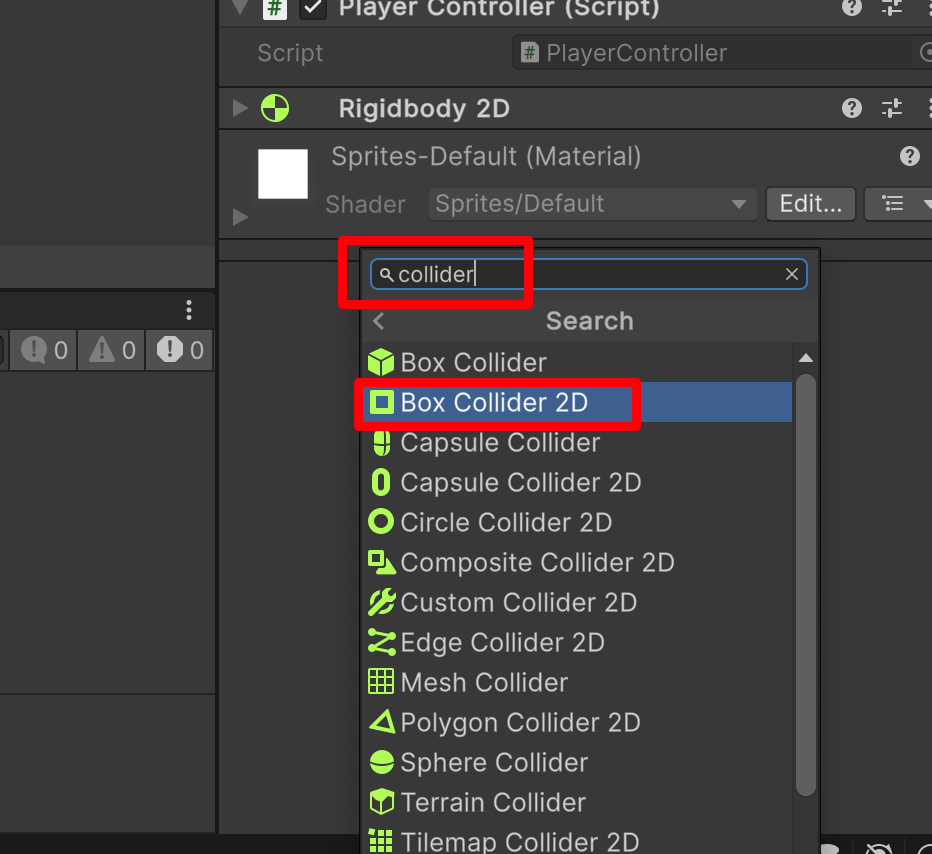
这样我们的组件就添加进来了,接下来我们的角色外面会有一个绿色的框。
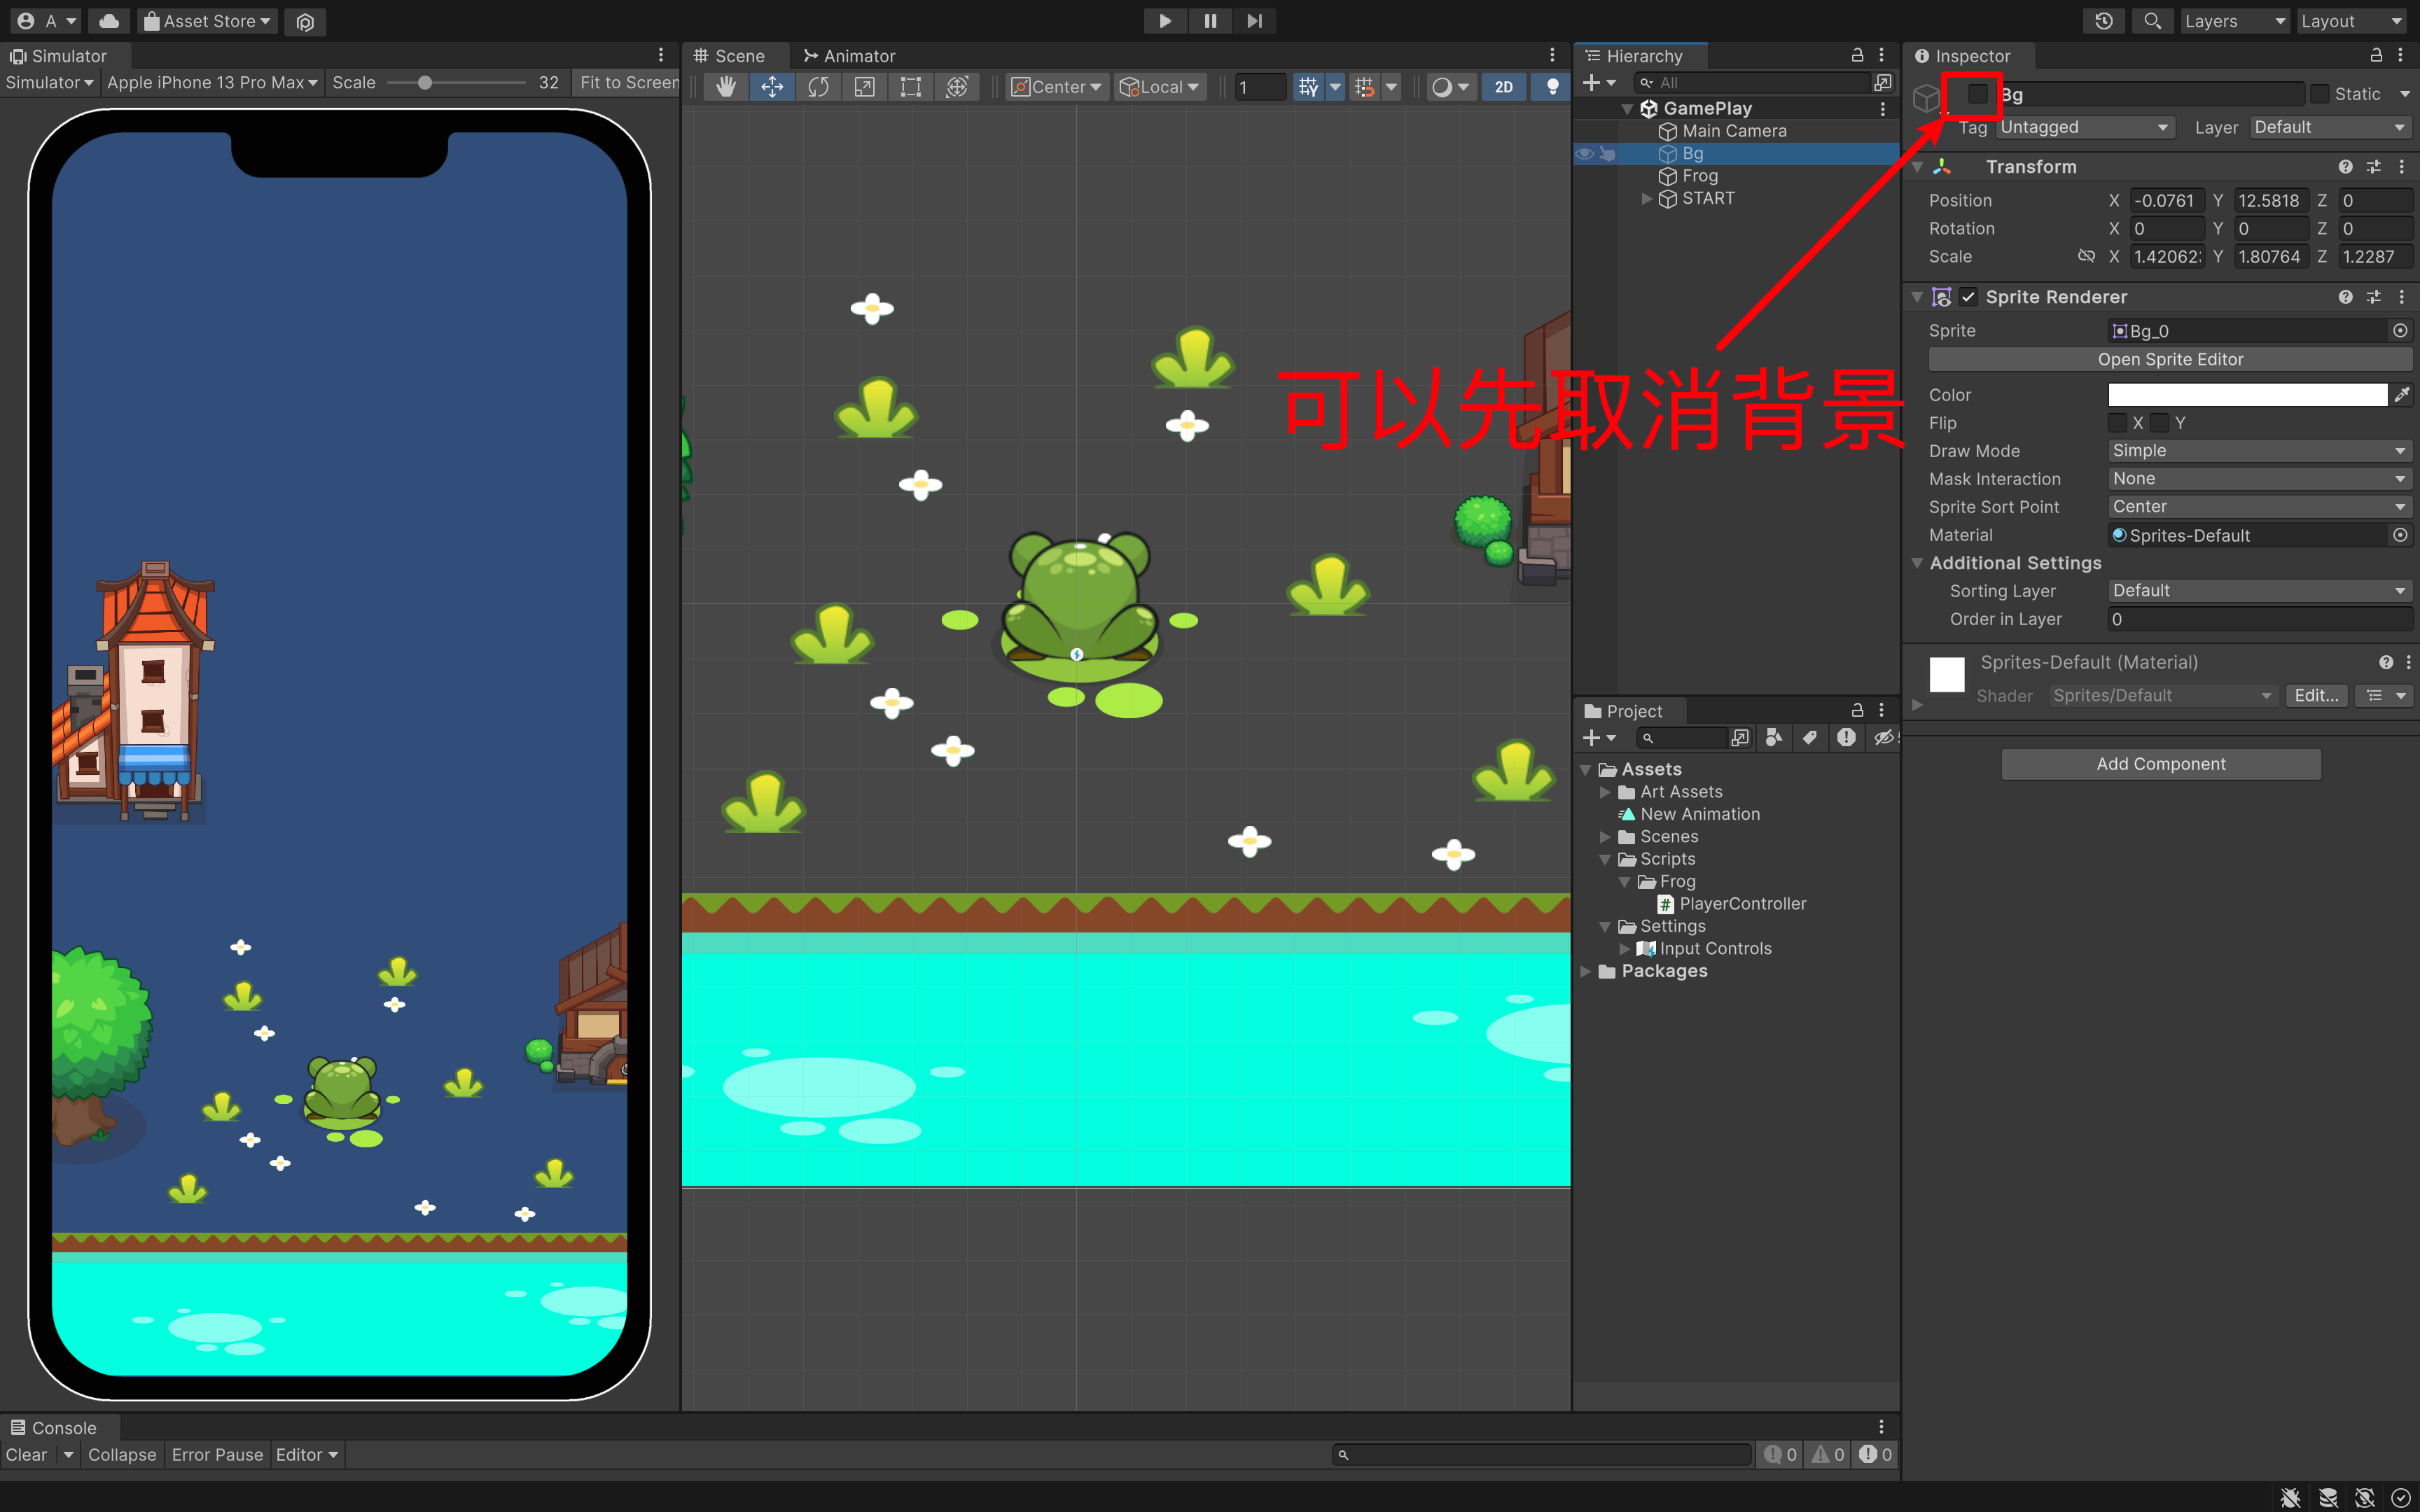
选中我们的青蛙🐸Frog,你就可以看见绿色的外框了。
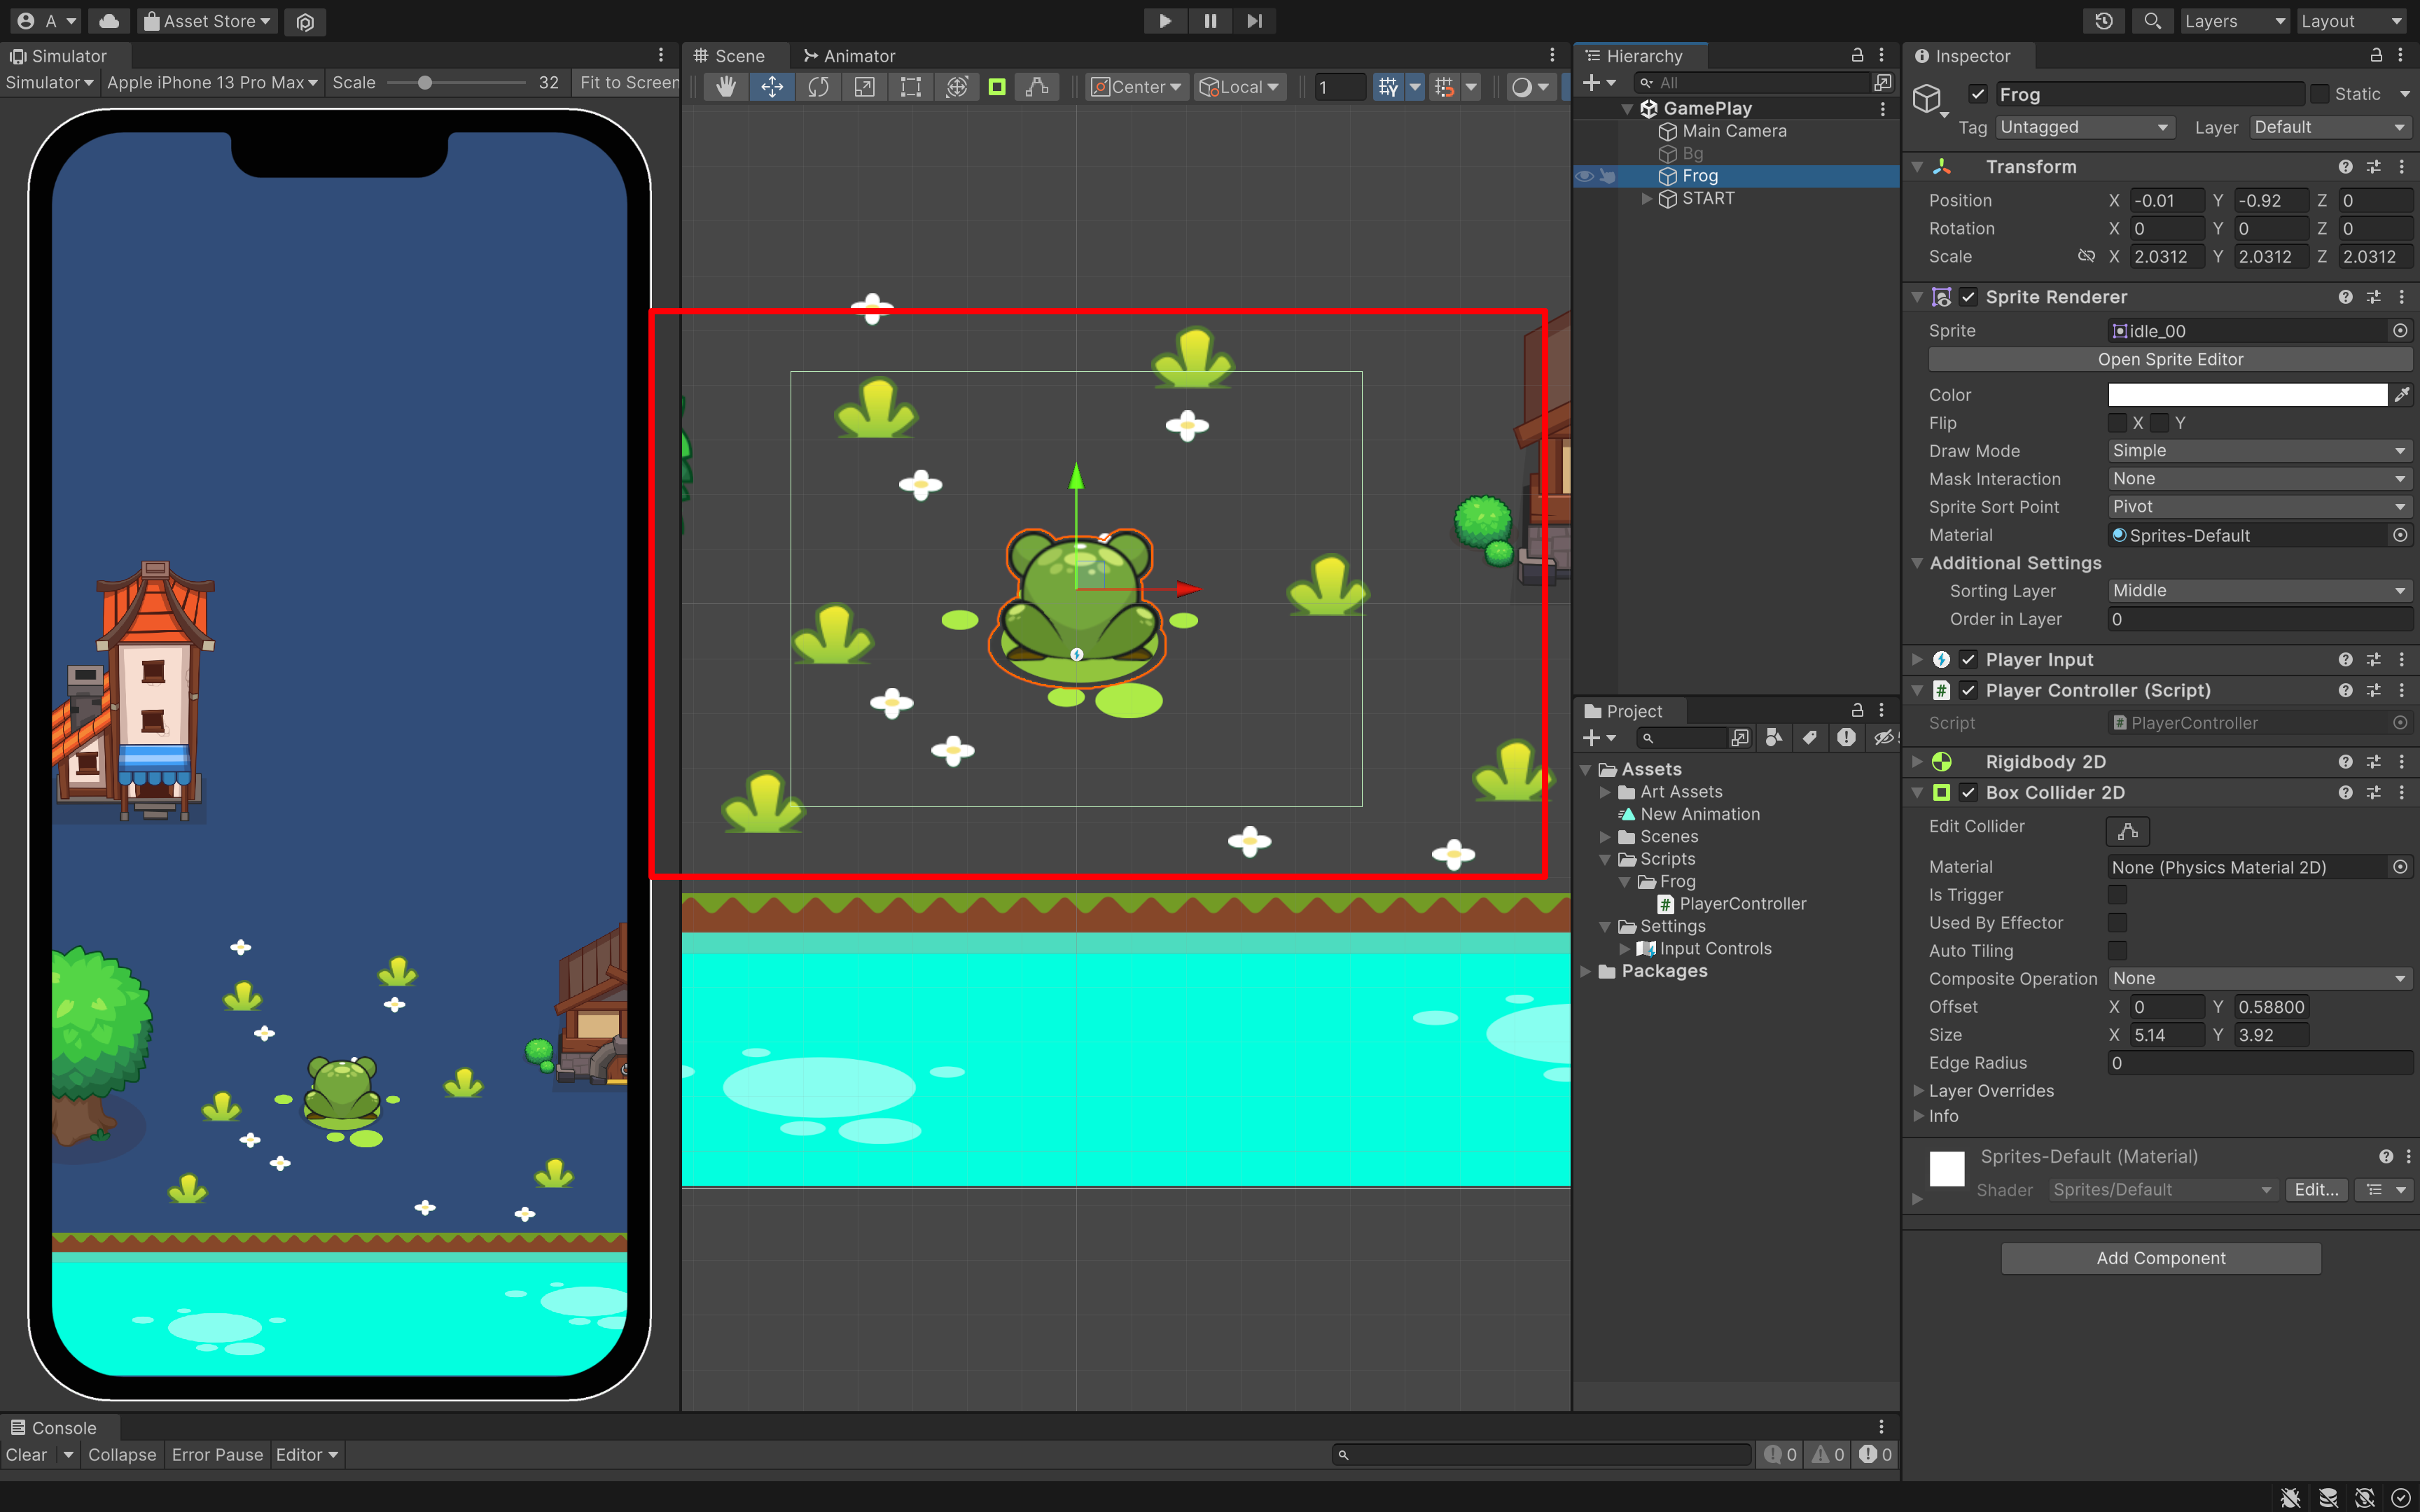
这是 collider 组件,预判了你图片的大小,来设置的。不过,这不是我们想要的。我们可以想想,我们有可能只需要脚底有碰撞检测就可以了,那我们来设置一下。

都可以进行设置。
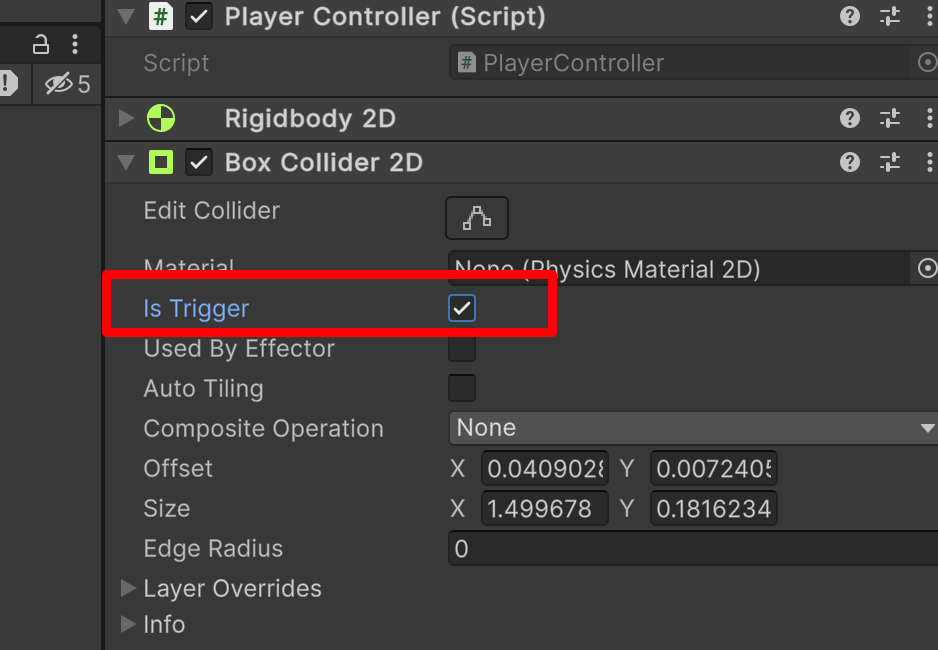
原本 is Trigger 原本是没有勾选的,我们可以勾选它。为什么呢?
——现在那个框是碰撞体,但是我们希望角色只和我们的另一个碰撞体「角色」碰撞有反应。而不是和我们地面碰撞也有反应。所以,我们可以设置 is Trigger ,也就是两个碰撞体的重合和接触。所以,我们可以利用不同的参数实现不同的效果。
3. 编写代码
using System.Collections;
using System.Collections.Generic;
using UnityEngine;
using UnityEngine.InputSystem;
public class PlayerController : MonoBehaviour
{
public void Jump(InputAction.CallbackContext context)
{
// TODO: 执行跳跃,跳跃的距离,记录分数,播放跳跃的音效
// 创建一个默认的函数写法
// public 公开的,其它类都可以调用
// void 没有返回类型
if (context.phase == InputActionPhase.Performed)
{ // 这样只有在功能完全的执行,我们才有里面的内容
Debug.Log("Jump! Hello..." + context);
}
}
设置 Event:
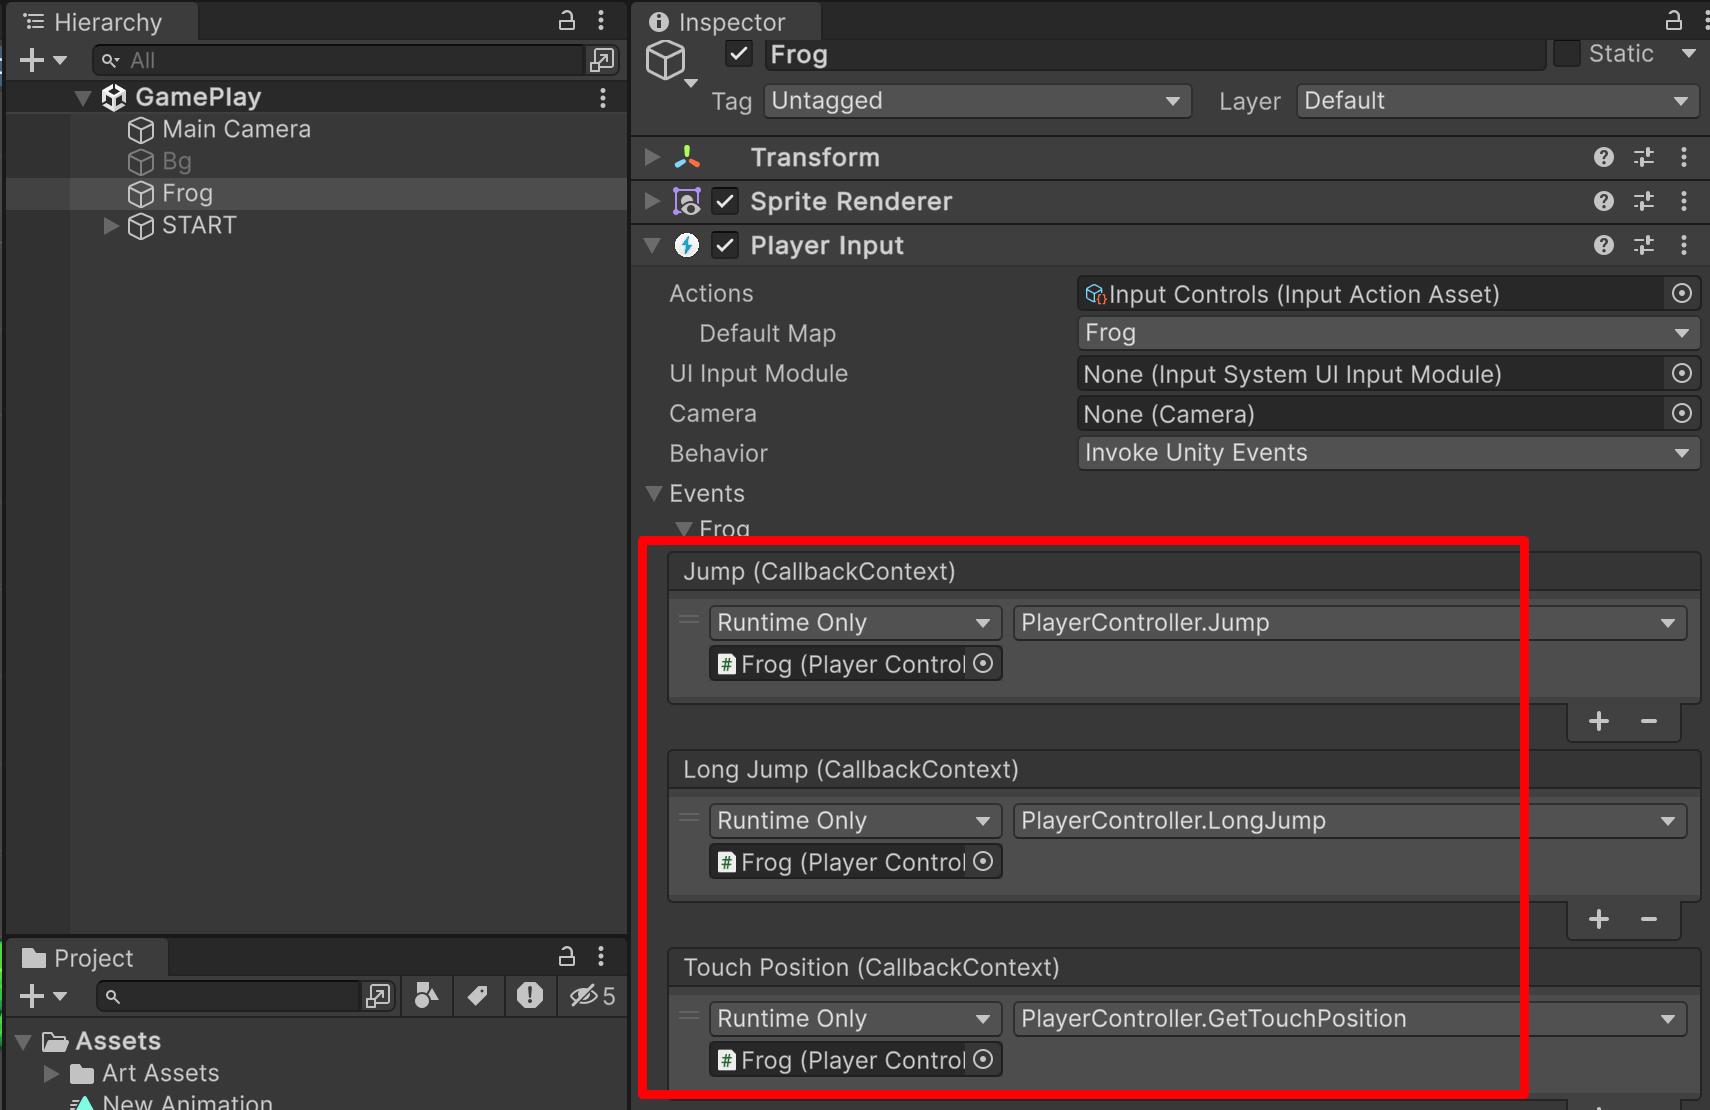
那我们现在要移动我们的小青蛙,我们需要哪些参数:我们要跳跃,我们要知道基本的跳跃距离。那长跳,是基本跳跃的二倍。
public class PlayerController : MonoBehaviour
{
    public float jumpDistance;
}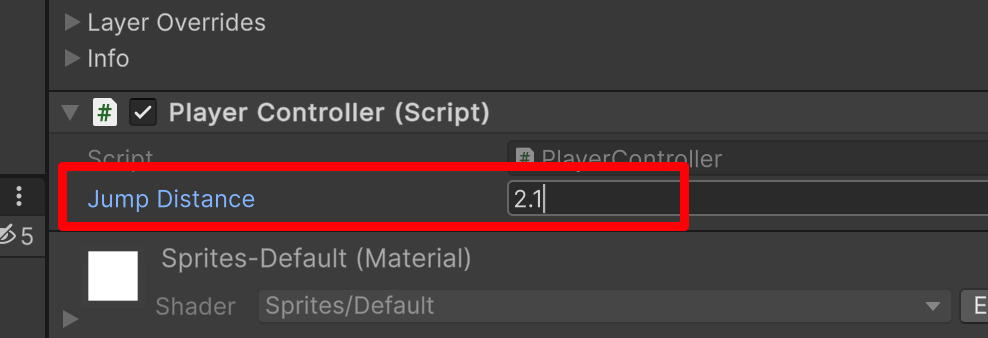
经过我的测试,我们小跳 2.1 是比较合适的,其他你们自行测试。
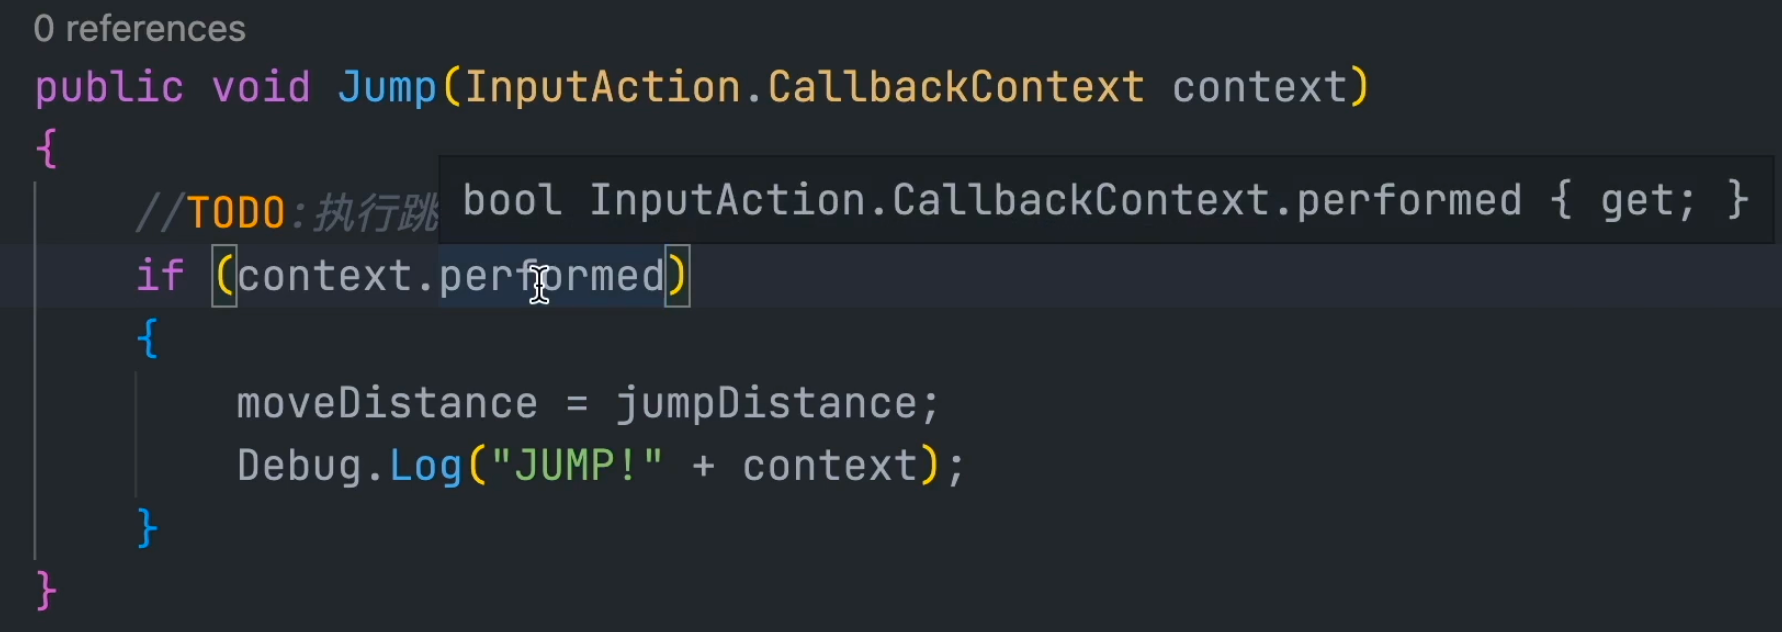
using System.Collections;
using System.Collections.Generic;
using UnityEngine;
using UnityEngine.InputSystem;

public class PlayerController : MonoBehaviour
{
    public float jumpDistance;
    private float moveDistance;  // 真实跳跃距离

    public void Jump(InputAction.CallbackContext context)
    {
        // TODO: 执行跳跃,跳跃的距离,记录分数,播放跳跃的音效
        // 创建一个默认的函数写法
        // public 公开的,其它类都可以调用
        // void 没有返回类型
        // if (context.phase == InputActionPhase.Performed) {  // 这样只有在功能完全的执行,我们才有里面的内容
        if (context.Performed) {  // 这样只有在功能完全的执行,我们才有里面的内容
            moveDistance = jumpDistance; // 小跳执行的话,那就是 jumpDistance
            Debug.Log("Jump!" + context);
        }
    }

    public void LongJump(InputAction.CallbackContext context) {
        if (context.Performed) {
            moveDistance = jumpDistance * 2;
            Debug.Log("Long Jump!" + context);
        }

    }

    public void GetTouchPosition(InputAction.CallbackContext context) {

    }
}
点击 Play 运行看看效果。
- 按下键盘空格,Jump 执行;
- 长按空格 Long Jump 执行了;
不过在测试的时候,你有可能会发现:我按下键盘,达到一定时间,可是我的键盘还没松开,Long Jump 已经执行了。我希望我的小青蛙,在松开的时候可以移动,那怎么记录按键松开的状态呢?「或者说是松开的阶段」
using System.Collections;
using System.Collections.Generic;
using UnityEngine;
using UnityEngine.InputSystem;

public class PlayerController : MonoBehaviour
{
    public float jumpDistance;
    private float moveDistance;  // 真实跳跃距离
    public void Jump(InputAction.CallbackContext context)
    {
        // 创建一个默认的函数写法
        // public 公开的,其它类都可以调用
        // void 没有返回类型
        // if (context.phase == InputActionPhase.Performed)
        // 下面是简写
        if (context.performed)
        {  // 这样只有在功能完全的输出,我们才有里面的内容
            // Debug.Log("Jump! Hello..." + context);
            // 也改成具体跳跃的距离,方便后期调试
            moveDistance = jumpDistance;
            Debug.Log("JUMP!" + " " + moveDistance);
        }
    }

    public void LongJump(InputAction.CallbackContext context) {
        if (context.performed)
        {
            moveDistance = jumpDistance * 2; // 小跳执行的话,那就是 jumpDistance
            // Debug.Log("LONG JUMP!" + " " + moveDistance);
        }

        // canceled 取消了
        if (context.canceled)
        {
            // 松掉空格「按键」
            // TODO: 执行跳跃,而我们说了,要在松掉键盘,执行。那么把上面的 30 行代码,移动下来:
            Debug.Log("LONG JUMP!" + " " + moveDistance);

        }
    }

    public void GetTouchPosition(InputAction.CallbackContext context) {

    }
}
测试运行:

你会发现,按下空格两个同时运行了,看来还有 bug 我们继续修改。——原因是什么呢?
我按下键盘,松开的时候,Long Jump 也执行了一次。那么我们再测试一下,直接长按,然后你会发现按再久也没有输出,松开就输出了。并且输出变成了 2 倍。
现在我来解决:context.canceled 会同时监测到短按的键盘抬起,所以,一旦抬起,短按的命令和长按的命令都会被执行。
所以,我们需要添加一个状态的判断,我们松开的时候,只是执行短按或者长按。
// ---snip---
public class PlayerController : MonoBehaviour
{
    // ---snip---
    private bool buttonHeld;  // 代表是否长按
    // ---snip---

    public void LongJump(InputAction.CallbackContext context) {
        if (context.performed)
        {
            moveDistance = jumpDistance * 2; // 小跳执行的话,那就是 jumpDistance
            // Debug.Log("LONG JUMP!" + " " + moveDistance);
            buttonHeld = true;  // 一旦被长按了,我们的 buttonHeld 就为 true
        }

        // canceled 取消了
        if (context.canceled && buttonHeld) // 既要是被按下松开 context.canceled && 也要是 true buttonHeld
        {
            // 松掉空格「按键」
            // TODO: 执行跳跃,而我们说了,要在松掉键盘,执行。那么把上面的 29 行代码,移动下来:
            Debug.Log("LONG JUMP!" + " " + moveDistance);
            buttonHeld = false;  // 把状态改回来
        }
    }

    // ---snip---
}using System.Collections;
using System.Collections.Generic;
using UnityEngine;
using UnityEngine.InputSystem;
public class PlayerController : MonoBehaviour
{
public float jumpDistance;
private float moveDistance; // 真实跳跃距离
private bool buttonHeld; // 代表是否长按
public void Jump(InputAction.CallbackContext context)
{
// 创建一个默认的函数写法
// public 公开的,其它类都可以调用
// void 没有返回类型
// if (context.phase == InputActionPhase.Performed)
// 下面是简写
if (context.performed)
{ // 这样只有在功能完全的输出,我们才有里面的内容
// Debug.Log("Jump! Hello..." + context);
// 也改成具体跳跃的距离,方便后期调试
moveDistance = jumpDistance;
Debug.Log("JUMP!" + " " + moveDistance);
}
}
public void LongJump(InputAction.CallbackContext context) {
if (context.performed)
{
moveDistance = jumpDistance * 2; // 小跳执行的话,那就是 jumpDistance
// Debug.Log("LONG JUMP!" + " " + moveDistance);
buttonHeld = true; // 一旦被长按了,我们的 buttonHeld 就为 true
}
// canceled 取消了
if (context.canceled && buttonHeld) // 既要是被按下松开 context.canceled && 也要是 true buttonHeld
{
// 松掉空格「按键」
// TODO: 执行跳跃,而我们说了,要在松掉键盘,执行。那么把上面的 29 行代码,移动下来:
Debug.Log("LONG JUMP!" + " " + moveDistance);
buttonHeld = false; // 把状态改回来
}
}
public void GetTouchPosition(InputAction.CallbackContext context) {
}
}using System.Collections;
using System.Collections.Generic;
using UnityEngine;
using UnityEngine.InputSystem;
public class PlayerController : MonoBehaviour
{
public float jumpDistance;
private float moveDistance; // 真实跳跃距离
private bool buttonHeld; // 代表是否长按
public void Jump(InputAction.CallbackContext context)
{
// 创建一个默认的函数写法
// public 公开的,其它类都可以调用
// void 没有返回类型
// if (context.phase == InputActionPhase.Performed)
// 下面是简写
if (context.performed)
{ // 这样只有在功能完全的输出,我们才有里面的内容
// Debug.Log("Jump! Hello..." + context);
// 也改成具体跳跃的距离,方便后期调试
moveDistance = jumpDistance;
// Debug.Log("JUMP!" + " " + moveDistance); // 可以先注释掉了,不然控制台太乱
}
}
public void LongJump(InputAction.CallbackContext context) {
if (context.performed)
{
moveDistance = jumpDistance * 2; // 小跳执行的话,那就是 jumpDistance
// Debug.Log("LONG JUMP!" + " " + moveDistance);
buttonHeld = true; // 一旦被长按了,我们的 buttonHeld 就为 true
}
// canceled 取消了
if (context.canceled && buttonHeld) // 既要是被按下松开 context.canceled && 也要是 true buttonHeld
{
// 松掉空格「按键」
// TODO: 执行跳跃,而我们说了,要在松掉键盘,执行。那么把上面的 29 行代码,移动下来:
// Debug.Log("LONG JUMP!" + " " + moveDistance); // 可以先注释掉了,不然控制台太乱
buttonHeld = false; // 把状态改回来
}
}
public void GetTouchPosition(InputAction.CallbackContext context) {
}
}这样就正常了。
4. 实现移动
小青蛙的移动上面讲了,不要使用 Transform 来实现,要是用 Rigidbody2D。
//  ---snip---
public class PlayerController : MonoBehaviour
{
    // 组件一般写在上面
    // 一般用两种方法: 一种就是 public 但是不推荐,因为 public 实现,需要我们自己去 Unity 里面去拖拽
    // private 我们可以实现获取 Frog 自身身上的 Rigidbody2D 组件
    private Rigidbody2D rb;

	//  ---snip---

    // 我们要在我们的游戏最最开始第一帧执行,那么有一个周期函数是在 start 函数之前执行的,也就是 Awake
    // 「Unity 为我们提供好的周期代码函数」
    private void Awake()  // 会在 start 之前执行
    {
        rb = GetComponent<Rigidbody2D>();  // 获得自身身上的组件
    }

    // 我们前面说了,如果你想使用物理的话,我们需要在 FixedUpdate 里面执行
    private void FixedUpdate()
    // FixedUpdate 是固定每 0.02s 执行一次,它不会依照你系统的快慢来执行——所以它是一个非常稳定的物理系统
    {
        // 在这里吗我们要实现什么呢?——实现真实的移动
        // rb.position = Vector2.Lerp(起始坐标, 最终的坐标);  // Linearly interpolates between vectors a and b by t.// 通过 t 在向量 a 和 b 之间进行线性插值。
        // rb.position = Vector2.Lerp(transform.position, 那么最总坐标是?); // 目前不知道最终坐标位置,先注释掉
    }
    //  ---snip---
}
不过我们用 moveDistance,我们用现在的坐标 + moveDistance 不就是移动的目标坐标
//  ---snip---
public class PlayerController : MonoBehaviour
{
   //  ---snip---
    private Vector2 destination;  // 用来存储计算的值

    //  ---snip---
    private void FixedUpdate()
    {
        //  ---snip---
        rb.position = Vector2.Lerp(transform.position, destination,0.134f); // 目前不知道最终坐标位置,先注释掉
    }
    public void Jump(InputAction.CallbackContext context)
    {
        //  ---snip---
        if (context.performed)
        {
            //  ---snip---
            moveDistance = jumpDistance;
            destination = new Vector2(transform.position.x, transform.position.y + moveDistance);
        }
    }

    public void LongJump(InputAction.CallbackContext context)
    {
        //  ---snip---
        if (context.canceled && buttonHeld)
        {
            //  ---snip---
            destination = new Vector2(transform.position.x, transform.position.y + moveDistance);
            buttonHeld = false;
        }
    }

    //  ---snip---
}using System.Collections;
using System.Collections.Generic;
using UnityEngine;
using UnityEngine.InputSystem;
public class PlayerController : MonoBehaviour
{
// 组件一般写在上面
// 一般用两种方法: 一种就是 public 但是不推荐,因为 public 实现,需要我们自己去 Unity 里面去拖拽
// private 我们可以实现获取 Frog 自身身上的 Rigidbody2D 组件
private Rigidbody2D rb;
public float jumpDistance;
private float moveDistance; // 真实跳跃距离
private bool buttonHeld; // 代表是否长按
private Vector2 destination; // 用来存储计算的值
// 我们要在我们的游戏最最开始第一帧执行,那么有一个周期函数是在 start 函数之前执行的,也就是 Awake
// 「Unity 为我们提供好的周期代码函数」
private void Awake() // 会在 start 之前执行
{
rb = GetComponent<Rigidbody2D>(); // 获得自身身上的组件
}
// 我们前面说了,如果你想使用物理的话,我们需要在 FixedUpdate 里面执行
private void FixedUpdate()
// FixedUpdate 是固定每 0.02s 执行一次,它不会依照你系统的快慢来执行——所以它是一个非常稳定的物理系统
{
// 在这里吗我们要实现什么呢?——实现真实的移动
// rb.position = Vector2.Lerp(起始坐标, 最终的坐标); // Linearly interpolates between vectors a and b by t.// 通过 t 在向量 a 和 b 之间进行线性插值。
// rb.position = Vector2.Lerp(transform.position, 那么最总坐标是?); // 目前不知道最终坐标位置,先注释掉
rb.position = Vector2.Lerp(transform.position, destination,0.134f); // 目前不知道最终坐标位置,先注释掉
// 不过我们用 moveDistance,我们用现在的坐标+moveDistance不就是移动的目标坐标
}
public void Jump(InputAction.CallbackContext context)
{
// 创建一个默认的函数写法
// public 公开的,其它类都可以调用
// void 没有返回类型
// if (context.phase == InputActionPhase.Performed)
// 下面是简写
if (context.performed)
{ // 这样只有在功能完全的输出,我们才有里面的内容
// Debug.Log("Jump! Hello..." + context);
// 也改成具体跳跃的距离,方便后期调试
moveDistance = jumpDistance;
// Debug.Log("JUMP!" + " " + moveDistance); // 可以先注释掉了,不然控制台太乱
destination = new Vector2(transform.position.x, transform.position.y + moveDistance);
}
}
public void LongJump(InputAction.CallbackContext context)
{
if (context.performed)
{
moveDistance = jumpDistance * 2; // 小跳执行的话,那就是 jumpDistance
// Debug.Log("LONG JUMP!" + " " + moveDistance);
buttonHeld = true; // 一旦被长按了,我们的 buttonHeld 就为 true
}
// canceled 取消了
if (context.canceled && buttonHeld) // 既要是被按下松开 context.canceled && 也要是 true buttonHeld
{
// 松掉空格「按键」
// TODO: 执行跳跃,而我们说了,要在松掉键盘,执行。那么把上面的 29 行代码,移动下来:
// Debug.Log("LONG JUMP!" + " " + moveDistance); // 可以先注释掉了,不然控制台太乱
buttonHeld = false; // 把状态改回来
destination = new Vector2(transform.position.x, transform.position.y + moveDistance);
}
}
public void GetTouchPosition(InputAction.CallbackContext context)
{
}
}使用了非线性速度的跳跃,每次移动两个坐标的0.134距离,凑18帧跳跃完成,和后面的跳跃18帧触发落地事件呼应
18帧抛去开始结束的2帧,16*0.134差不多正好是2.1的距离范围
注意
角色、背景坐标一定要记得设置为 0!!!不然,一点测试运行,就自动跑了。
我们现在有一个问题:就是一直连续按空格我们的青蛙,会一直往前。但是我们需要青蛙要有一个状态。
——我们加个条件,如果正在跳跃的话,我们不允许再按。
public class PlayerController : MonoBehaviour
{
    // ---snip---
    private bool isJump;
	// ---snip---

    private void Update()
    {
        // isJump 什么时候变成 flase 呢?
        // FIXME:临时操作
        // if (transform.position.y == destination.y)
        if (destination.y - transform.position.y < 0.1f)
        {
            isJump = false;
        }
    }

    // 我们前面说了,如果你想使用物理的话,我们需要在 FixedUpdate 里面执行
    private void FixedUpdate()
    // FixedUpdate 是固定每 0.02s 执行一次,它不会依照你系统的快慢来执行——所以它是一个非常稳定的物理系统
    {
        // 在这里吗我们要实现什么呢?——实现真实的移动
        // rb.position = Vector2.Lerp(起始坐标, 最终的坐标);  // Linearly interpolates between vectors a and b by t.// 通过 t 在向量 a 和 b 之间进行线性插值。
        // rb.position = Vector2.Lerp(transform.position, 那么最终坐标是?); // 目前不知道最终坐标位置,先注释掉
        if (isJump)  // 如果正在跳跃,则进行计算
        {
            rb.position = Vector2.Lerp(transform.position, destination, 0.134f); // 目前不知道最终坐标位置,先注释掉
                                                                                 // 不过我们用 moveDistance,我们用现在的坐标+moveDistance不就是移动的目标坐标
        }
    }
    public void Jump(InputAction.CallbackContext context)
    {
        // 创建一个默认的函数写法
        // public 公开的,其它类都可以调用
        // void 没有返回类型
        // if (context.phase == InputActionPhase.Performed)
        // 下面是简写
        // if (context.performed && isJump == false)
        if (context.performed && !isJump)  // 要执行跳跃,那前提是当前的青蛙没有跳跃
        {  // 这样只有在功能完全的输出,我们才有里面的内容
            // Debug.Log("Jump! Hello..." + context);
            // 也改成具体跳跃的距离,方便后期调试
            moveDistance = jumpDistance;
            // Debug.Log("JUMP!" + " " + moveDistance);  // 可以先注释掉了,不然控制台太乱

            destination = new Vector2(transform.position.x, transform.position.y + moveDistance);
            isJump = true;
        }
    }

    public void LongJump(InputAction.CallbackContext context)
    {
        if (context.performed && !isJump)  // 要执行跳跃,那前提是当前的青蛙没有跳跃
        {
            moveDistance = jumpDistance * 2; // 小跳执行的话,那就是 jumpDistance
            // Debug.Log("LONG JUMP!" + " " + moveDistance);
            buttonHeld = true;  // 一旦被长按了,我们的 buttonHeld 就为 true
        }

        // canceled 取消了
        if (context.canceled && buttonHeld && !isJump) // 既要是被按下松开 context.canceled && 也要是 true buttonHeld
        {
            // 松掉空格「按键」
            // TODO: 执行跳跃,而我们说了,要在松掉键盘,执行。那么把上面的 29 行代码,移动下来:
            // Debug.Log("LONG JUMP!" + " " + moveDistance);  // 可以先注释掉了,不然控制台太乱
            buttonHeld = false;  // 把状态改回来
            destination = new Vector2(transform.position.x, transform.position.y + moveDistance);
            isJump = true;
        }
    }

    public void GetTouchPosition(InputAction.CallbackContext context)
    {

    }
}
5. 完整代码
using System.Collections;
using System.Collections.Generic;
using UnityEngine;
using UnityEngine.InputSystem;

public class PlayerController : MonoBehaviour
{
    // 组件一般写在上面
    // 一般用两种方法: 一种就是 public 但是不推荐,因为 public 实现,需要我们自己去 Unity 里面去拖拽
    // private 我们可以实现获取 Frog 自身身上的 Rigidbody2D 组件
    private Rigidbody2D rb;

    public float jumpDistance;
    private float moveDistance;  // 真实跳跃距离
    private bool buttonHeld;  // 代表是否长按
    private Vector2 destination;  // 用来存储计算的值
    private bool isJump;
    // 我们要在我们的游戏最最开始第一帧执行,那么有一个周期函数是在 start 函数之前执行的,也就是 Awake
    // 「Unity 为我们提供好的周期代码函数」
    private void Awake()  // 会在 start 之前执行
    {
        rb = GetComponent<Rigidbody2D>();  // 获得自身身上的组件
    }

    private void Update()
    {
        // isJump 什么时候变成 flase 呢?
        // FIXME:临时操作
        // if (transform.position.y == destination.y)
        if (destination.y - transform.position.y < 0.1f)
        {
            isJump = false;
        }
    }

    // 我们前面说了,如果你想使用物理的话,我们需要在 FixedUpdate 里面执行
    private void FixedUpdate()
    // FixedUpdate 是固定每 0.02s 执行一次,它不会依照你系统的快慢来执行——所以它是一个非常稳定的物理系统
    {
        // 在这里吗我们要实现什么呢?——实现真实的移动
        // rb.position = Vector2.Lerp(起始坐标, 最终的坐标);  // Linearly interpolates between vectors a and b by t.// 通过 t 在向量 a 和 b 之间进行线性插值。
        // rb.position = Vector2.Lerp(transform.position, 那么最终坐标是?); // 目前不知道最终坐标位置,先注释掉
        if (isJump)  // 如果正在跳跃,则进行计算
        {
            rb.position = Vector2.Lerp(transform.position, destination, 0.134f); // 目前不知道最终坐标位置,先注释掉
                                                                                 // 不过我们用 moveDistance,我们用现在的坐标+moveDistance不就是移动的目标坐标
        }
    }
    public void Jump(InputAction.CallbackContext context)
    {
        // 创建一个默认的函数写法
        // public 公开的,其它类都可以调用
        // void 没有返回类型
        // if (context.phase == InputActionPhase.Performed)
        // 下面是简写
        // if (context.performed && isJump == false)
        if (context.performed && !isJump)  // 要执行跳跃,那前提是当前的青蛙没有跳跃
        {  // 这样只有在功能完全的输出,我们才有里面的内容
            // Debug.Log("Jump! Hello..." + context);
            // 也改成具体跳跃的距离,方便后期调试
            moveDistance = jumpDistance;
            // Debug.Log("JUMP!" + " " + moveDistance);  // 可以先注释掉了,不然控制台太乱

            destination = new Vector2(transform.position.x, transform.position.y + moveDistance);
            isJump = true;
        }
    }

    public void LongJump(InputAction.CallbackContext context)
    {
        if (context.performed && !isJump)  // 要执行跳跃,那前提是当前的青蛙没有跳跃
        {
            moveDistance = jumpDistance * 2; // 小跳执行的话,那就是 jumpDistance
            // Debug.Log("LONG JUMP!" + " " + moveDistance);
            buttonHeld = true;  // 一旦被长按了,我们的 buttonHeld 就为 true
        }

        // canceled 取消了
        if (context.canceled && buttonHeld && !isJump) // 既要是被按下松开 context.canceled && 也要是 true buttonHeld
        {
            // 松掉空格「按键」
            // TODO: 执行跳跃,而我们说了,要在松掉键盘,执行。那么把上面的 29 行代码,移动下来:
            // Debug.Log("LONG JUMP!" + " " + moveDistance);  // 可以先注释掉了,不然控制台太乱
            buttonHeld = false;  // 把状态改回来
            destination = new Vector2(transform.position.x, transform.position.y + moveDistance);
            isJump = true;
        }
    }

    public void GetTouchPosition(InputAction.CallbackContext context)
    {

    }
}
欢迎关注我公众号:AI悦创,有更多更好玩的等你发现!
公众号:AI悦创【二维码】

AI悦创·编程一对一
AI悦创·推出辅导班啦,包括「Python 语言辅导班、C++ 辅导班、java 辅导班、算法/数据结构辅导班、少儿编程、pygame 游戏开发、Linux、Web全栈」,全部都是一对一教学:一对一辅导 + 一对一答疑 + 布置作业 + 项目实践等。当然,还有线下线上摄影课程、Photoshop、Premiere 一对一教学、QQ、微信在线,随时响应!微信:Jiabcdefh
C++ 信息奥赛题解,长期更新!长期招收一对一中小学信息奥赛集训,莆田、厦门地区有机会线下上门,其他地区线上。微信:Jiabcdefh
方法一:QQ
方法二:微信:Jiabcdefh
更新日志
1c35a-于aed17-于3d64a-于7d5ef-于5154b-于e43d4-于4b463-于c5b51-于1549c-于7df9d-于a001a-于91703-于da941-于8164a-于5b064-于cbb3a-于610fe-于68346-于76989-于86c50-于027da-于